Thursday, April 29, 2010

Understanding Maven Archetype

The Archetype plugin allows you to use a pre-defined pattern for project development. You can have a pattern for different kind of project (Hibernate/Spring, JSF or JBoss Service Archive). You can have 249 choices of Archetype using this command from the CLI:

mvn archetype:generate.

Choice #15 is a quick start template, it sets up a simple JEE application embedded with Apache Jetty application server.

Getting back to Hibernate tutorial, they recommand you to use mvn archetype:create to build your template.

create goal has been deprecated as of version 2-0 of the plugin although it still works. To create the template, you can start running the goal and define groupId and artifactId:

mvn archetype:create -DgroupId=org.hibernate.tutorials -DartifactId=hibernate-tutorial

The Archetype plugin creates the following project template:

hibernate-tutorial

--src
--main
--java
--org
--hibernate
--tutorials
--App.java
--test
--java
--org
--hibernate
--tutorials
--AppTest.java


As you can see, the groupId property defines the package structure of the project, the artifactId property is the root folder of the application. A test folder is also generated with the same package structure and a Test file.
The pom.xml file is created at the same level as src. If you edit the file, you will see that a dependency is created for JUnit v3.8.1.

Tuesday, April 27, 2010

Maven Configuration Setup

As I was doing the Hibernate tutorial (which is a nightmare by the way), I was required to learn about Maven and the HSQLDB database server. To build the tutorial, you have to use Maven and HSQLDB. Following this tutorial step by step was impossible, and in Hibernate's community forum, it seemed that I was not the only person complaining.
HSQLDB is pretty straightforward to set up. It is a full Java database; its database server runs with the java command from command line and it also comes along with a Swing client.
Maven is a little more challenging. Maven as far as I understand is similar to Ant but is easier to manipulate. Like Ant, it's a build automation tool and a project management tool.

Once, you have downloaded Maven installation file, follow the configuration steps in the readme file. Yes... it seems obvious but I rarely read readme files. Maven website doesn't give directions for basic configuration. So when I started Maven's tutorial, nothing worked. I was stucked with Maven, and I could not go ahead with Hibernate. Here are the basic directions from Windows or Linux:
- Unzip the files in a folder.
- Add M2_HOME environment variable (user level).
- For Linux, add a M2 environment variable that points to $M2_HOME/bin at user level.
- Optionally, add MAVEN_OPTS environment variable with the following values: "-Xms256m -Xmx512m".
- Make sure the JAVA_HOME is defined.
- Add MAVEN's binary files into PATH (M2_HOME\bin for Windows and M2 for Linux).
Test your configuration from the command line interface with: mvn --version.

Saturday, July 25, 2009

Setup a Virtual Network with Virtual Box 2.2.4


Setup a Virtual Network with earlier versions of Version of Virtual Box required a lot of steps to create a bridge, and to enable Layer 3 Compatibility for the adapters in the bridge. Since VirtualBox 2.1.4, the process has been made more simple.

1- Configure the Network Preferences of your Box


Set the Network Access Mode to Bridge Access. Then select of the adapter you would like your box being bridged to (generally it would be the adapter connected to the Internet).

2- Define your IP Configuration
In your box, independantly from the operating system you are using, define manually the IP address, sub-network mask, the default gateway as well as the DNS which is going to be your default gateway.

Saturday, June 27, 2009

Setup Sun JVM and JDK in Ubuntu

This one is pretty simple, but I tend to forget the steps when I don't do it for a long time.
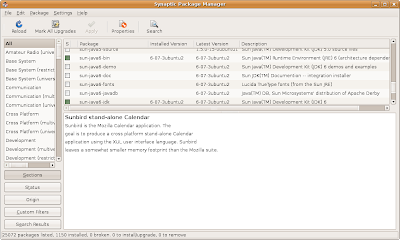
1- Use the Synaptic Package Manager to download the last JDK version for Ubuntu. Select sun-java6-jdk package.


The Synaptic application will prompt you for additional packages to download. Mark them, and click the Apply button to start the download. Confirm by clicking Apply in the Summary window.


The Synaptic Manager will start to download the package files.
2- Then, make sure that your environment use the Sun flavour of the JVM you have just setup.
Use the following command in terminal window to check the list of Java flavours in your system.


To have the Sun flavor as the current Java version, use the following command:
sudo update-java-alternatives -s java-6-sun


Saturday, December 20, 2008

Setup Pentaho Design Studio for Linux and Test your installation

1- Setup Design Studio as an Eclipse plugin
At this time, there is no complete Design Studio available for Linux and Mac users. Once you have installed your Java environment, your environment variables, and the BI server, you can now install the Eclipse IDE and the plugin for Pentaho Design Studio. You can find the last version of Eclipse IDE with your Synaptic Package Manager, but the Pentaho Design Studio Release for Community can be downloaded from the Pentaho website or directly from sourceforge.net.
In the zip file, go to the plugins folder and extract the following files:
  • org.pentaho.designstudio.editors.actionsequence_2.0.0.974
  • org.pentaho.designstudio.editors.core_2.0.0.616

  • org.pentaho.designstudio.editors.reportwizard_2.0.0.1037
Move these folders to usr/lib/eclipse/plugins folder so that the plugins will be found by Eclipse. But you need first get the permission to write in the plugins folder. You can do it by giving yourself the ownership of this folder which I found is the easiest way or by changing permissions settings. The following command gives yourself the ownership of the plugins folder in Eclipse:

From usr/lib/eclipse directory, type in:

sudo chown plugins

username represent your current username. Copy the 3 previous files in your Eclipse plugin folder.

2- Create a Solution Project

Start Eclipse. Got to File > New > Project. (My Eclipse version is the 3.2.2). Expand General and select Project, click Next. Type Pentaho Solutions as the project name.

Uncheck the Use the Default Location, and Browse to your BI server installation folder > pentaho-solution. In the Package explorer, you will be able to see the content of your project.

3- Test an Hello World Action Sequence

In the left-hand tree, expand bi-developers > getting-started. Double-click HelloWorld.xaction.

In the Pentaho Server URL text box, type your BI server address which normally is: localhost:8080/pentaho. Click the Test Server button and the server login page should appear in the built-in web browser.

Log in as the Joe(admin), the password field is filled automatically. You will be redirected to the Pentaho admin page.

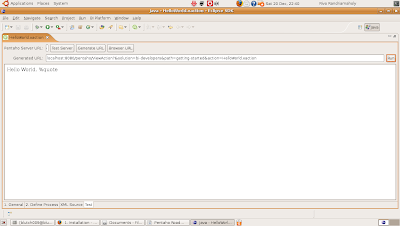
Click the Generate URL button and then click Run to open the HelloWorld.xaction page. You should have the following result.
4- Change the HelloWorld Action Sequence

Click the Define Process tab and select Hello World. In the message drop-down list box, change the "%quote" to "-I did it". As your BI server uses the DB-base solution repository, action sequences are run from the database repository. You need to tell the server to refresh the database. Go back to the test tab; you will be prompted to save your changes to your Action Sequence. Click Yes.
Go back to the admin page at localhost:8080/pentaho.
Click Tool > Refresh > Repository Cache.
A message box information will tell you that the refreshing has been successful.

Click the Generate URL button and then the Run button to display the result of the action sequence. The new page will display: Hello World - I did it.

Setup the new BI server 2.0 in Linux-Ubuntu

1- Setup the Java environment
This new BI server version 2 installation and using is really more straightforward. You first need to install the last version of the Java Development Kit or Java Runtime Environment from the Synaptic Package Manager. To do this, go to System > Administration > Synaptic Package Manager. You will be prompted for your administrator password before the package manager window open.
Look for the sun-java6-jdk. Right-click and select Mark for Installation. Then click the Apply button in the toolbar. The Synaptic Package Manager will download all the necessary files and take care of the installation process automatically.

2- Setup the environment variables
You only need to setup to environment variable JAVA_HOME and JRE_HOME and make them persistent.
In you .profile file in your folder (this file is normally hidden), add the 2 following lines:
  • export JAVA_HOME=/usr/lib/jvm/java6_xxx
  • export JRE_HOME=/usr/lib/jvm/java6_xxx/jre
Then from your terminal, go to your BI server folder that you have downloaded (I dowloaded this file version for the matter of this tutorial: biserver-ce-2.0.0-RC1.tar.gz) and unzipped in your user folder. Then from the terminal window, go to your new installation folder and from there, you can start your BI server with the following command:
./start-pentaho.sh
To stop it, type in:
./stop-pentaho.sh
As you will see, this Community Release of the BI 2.0 server is embedded with hsqldb as the database server with some sample data and Apache Tomcat as the application server.

Friday, December 12, 2008

How To Make your Pentaho BI Server Accessible from your LAN

Pentaho 1.7 GA comes with JBoss as the Application Server by default. To make your server accessible from your LAN, you will need to modify your server.xml and your starting and stopping script.

1- Modify your server.xml file

In your JBoss folder, go to server > default > deploy >jboss-web.deployer >server.xml.

Change the address attribute of your connector tag to your server IP address:


2- Modify your scripts
In your start-pentaho script, add the following parameter in the line that starts the JBoss server:
-b 192.168.1.108 (The IP address should be your server IP address).
at this line /home/blutch009/pentaho/bi-server/jboss/run.sh -b 192.168.1.108
This line starts your JBoss AS and binds it to your server IP address so that it can be accessible from within your LAN at the port specified in your server.xml file (8080 by default).
In your stop-pentaho script, add your server IP address at this line after -S:
pentaho/bi-server/jboss/bin/shutdown.sh -S 192.168.1.108