Monday, September 26, 2011
Null-coalesce Operator (?? in C# If() in Visual Basic)
It is used to define a default value for a nullable value type as well as a reference type. It returns the left-hand operator if it is not null, otherwise, the right-hand operator.
Syntax in C#: (TestValue ?? DefaultValue)
Syntax in Visual Basic: If(TestValue, DefaultValue)
Tuesday, March 1, 2011
Using Javascript to change first line and default selection in a Value Prompt in Cognos 8
This is my first expierence using Javascript in Cognos 8 Report. Although, I have not find the solution myself, I think it is worth to blog it for future usage.
When using a value prompt select box, the title usually comes from the Query Subject header which is often the database column name. Cognos automatically assigns column name from package as title in the prompt select box. As a result, when users build or run the report, they want the value prompt title to be more meaningful than a col001 or whatever column name the DBA has assigned when designing the database. It is worth to mention that in a "perfect world" where all Framework Manager packages are designed correctly, this kind of issue never occur.
 The first step is to embed the Value Prompt into a Span HTML markup. You do this by drag and drop 2 HTML elements from the Toolbox tab before and after the value prompt list box.

The HTML code will be for the first (left) element:
 and for the 2nd HTML element (right):
 The second step is to add a 3rd HTML element at the end of the form, at the right of the Finish button.

This 3rd HTML element will contain Javascript code which dynamically changes the List Box title property and if needed, the List Box default selected value.
 The code is self-explanatory and looks as follows:
<script type="text/javascript">
var theSpan = document.getElementById("Span1");
var theSelect = theSpan.getElementsByTagName("select");
theSelect[0].options[0].text = 'A more meaningful title';
theSelect[0].options[2].selected=true;
canSubmitPrompt();
</script>
The theSpan variable stores the SPAN markup which is used to capture the select box into the theSelect variable. The next line changes the title using the text property of the first option (options[0]). The following line sets the 3rd option (options[2]) selected property to true to make it a default selection.
Finally the canSubmitPrompt() activates the Finish button.
When using a value prompt select box, the title usually comes from the Query Subject header which is often the database column name. Cognos automatically assigns column name from package as title in the prompt select box. As a result, when users build or run the report, they want the value prompt title to be more meaningful than a col001 or whatever column name the DBA has assigned when designing the database. It is worth to mention that in a "perfect world" where all Framework Manager packages are designed correctly, this kind of issue never occur.


This 3rd HTML element will contain Javascript code which dynamically changes the List Box title property and if needed, the List Box default selected value.

<script type="text/javascript">
var theSpan = document.getElementById("Span1");
var theSelect = theSpan.getElementsByTagName("select");
theSelect[0].options[0].text = 'A more meaningful title';
theSelect[0].options[2].selected=true;
canSubmitPrompt();
</script>
The theSpan variable stores the SPAN markup which is used to capture the select box into the theSelect variable. The next line changes the title using the text property of the first option (options[0]). The following line sets the 3rd option (options[2]) selected property to true to make it a default selection.
Finally the canSubmitPrompt() activates the Finish button.
Saturday, December 25, 2010
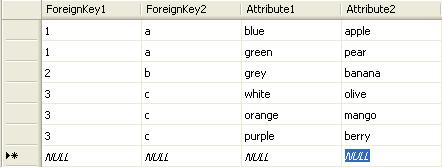
SQL Server 2005 - Transform Multiple Rows into Multiple Columns
Having this kind of table in SQL Server:
We would like to get to the following structure using SQL code:
This is a bit different from a PIVOT which can be done using the SQL Server function of the same name. What we wanted to get is for each combintation of ForeignKey1 and ForeignKey2, we would like to have all the possible combinations of Attribute1 and Attribute2 in the same row.
This could be done using a Transact SQL stored procedure of course but the following SQL code is the easiest approach if we know the maximum number of possibility for each combination of Foreign Keys:

We would like to get to the following structure using SQL code:
 |
Click the picture to see the full size.
This could be done using a Transact SQL stored procedure of course but the following SQL code is the easiest approach if we know the maximum number of possibility for each combination of Foreign Keys:
Click the picture to see the full size.
Monday, October 18, 2010
Dealing with Input/Output Scale in Cognos Transformer 8.3
Prerequisites:
Scale and Precision do not have the same meaning for Cognos and SQL Server.
In SLQ Server :
- scale: number of digit at the right of the decimal point.
- precision: maximum number of digit in a number.
Another good point to mention is the difference between Float and Decimal data type in SQL Server. A DECIMAL data type is a fixed precision data type which means that all the values in range can be represented exactly with scale and precision properties. This blog shows a good explanation.
In Cognos:
- precision: number of decimal places that the reporting tool uses for rollup calculations. Precision is only available when storage type is set to 64-bits.
- output scale: the source values are divided by ten taken to the power of the Output Scale value. If Output Scale is set to 3, then:
150,701 is shown in reports as 150,701/10^3; that is 150.701. If precision is set to 0, it will show 151 because of the rounding.
- input scale: Is a positive or negative power of ten by which the source values are to be multiplied as they are read from the data source.
150,701 is read in Transformer as 150,701*10^3; that is 150701000 if Input Scale is set to 3.
Dealing with Input/Output Scale in Cognos Transformer 8.3 with a float datatype
One of the requirements from business people is to make sure that the data they see in cubes is accurate. Most of the time, when they compare report results from cubes with data from operational systems, they always find differences in measures. Differences can come from a bad design in the ETL process to the datawarehouse, or (if we are confident in our ETL) roundings happening at the lowest level of aggregation that add up and make the summary calculation very different from what they expect to see.
In my experience, the DBA used SQL Server float data type. Unfortunately, when you define the column data type as float, SQL automatically sets precision property to 53 and scale property to 0. Scale property set to 0 doesn't mean that the float number is truncated or rounded when stored in the database, but when the float is queried from an external application (Transformer in our case), and the result is used by another application (Cognos Analysis), the final result is rounded: there is a loss of precision somewhere in the process as you'll see in the following screenshots.
 |
| In SQL Server, Scale1 column data type has been set to float. |
 |
| In Transformer, when testing with Data Source Viewer, Scale 1 column outputs as expected. (In this case, Transformer is retrieving our database table through a published Framework Manager package. Scale and Precision properties are read-only in Framework Manager.) |
 |
| In Transformer, Input Scale property is set to 0. |
 |
| In Transformer, Output Scale property is set to 0 as well as Precision. Storage type is 64-bits. |
 |
| In Analysis studio, Scale 1 is rounded. |
To get the business's expected result, we need to change scaling properties in Transformer. Setting Input Scale property to 3, Output Scale property to 3 and Precision to 2 (when your data is of float type) will give you the desired result.
 |
| Analysis Studio displays Scale 1 measure correctly. |
Tuesday, May 4, 2010
slf4j, Another Challenge in the Hibernate Tutorial
As I have succeeded to finally run the HSQLDB server using the maven plugin exec and java goal, I only needed to add the configuration files (hibernate.cfg.xml, Event.hbm.xml) and a utility class HibernateUtil.java in their correct location for Hibernate to work properly as mentionned in the tutorial book. Then the EventManager class will be the entry point for the application.
slf4j is a tool (slf4j-api.jar) that serves as a facade for other logging framework. These logging framework can be java.util.logging (which comes with the J2SE api), log4j, Jakarta Common Logging. What is interesting with slf4j is that you can use objects from slf4j-api.jar in your application, and then at runtime (or deployment time), the end-user of your application can decide to include the logging framework of his choice in the application classpath. The logging framework should of course be compatible with slf4j.
The Hibernate tutorial pom.xml file includes the following dependency to include slf4j in the tutorial application:
<dependency>
<groupId>org.slf4j</groupId>
<artifactId>slf4j-simple</artifactId>
</dependency>
When you deploy the tutorial application with this configuration, it throws an IllegalAccessError. Here, slf4j FAQ really helped (follow this link).
Basically Hibernate transitive dependency in Maven refers to an old version of the slf4j API which makes use of a property in StaticLoggerBinder class that has been made private since version 1.5.6. The best way to work around this is to explicitely add a dependency to slf4j-api which will overwrite the one from Hibernate. Elements for slf4j-api are:
groupId = org.slf4j
artifactId = slf4j-api
version = 1.6.0-RC0.
Then you can specify the binding element:
groupId = org.slf4j
artifactId = slf4j-simple (or slf4j-log4j12, slf4j-jdk14...)
version = 1.x.xyyy
Available versions and bindings can be found in Google using the following keywords "http://www.ibiblio.org/ maven2 slf4j".
slf4j-simple is only used in small application and logs event in stdout.
Friday, April 30, 2010
Advantage of Maven Transitive Dependency
Getting back to the Hibernate tutorial, now I understand the advantage of using Maven. Defining the dependency elements in the pom.xml is like asking Maven to take care of downloading the required files from the default repositories (repo1.maven.org by default) and paste those files in your repository so that they are accessible by your classpath.
Typing the "ibiblio.org maven2 hsqldb" in Google, you can find maven-metada.xml. This file gives you the groupId, the artifactId and the version number that you can use to have Maven retrieve an HyperSQL database server file that you can include in your project.
For Hibernate, you don't need to download Hibernate bundle as you'll have to manually include hibernate3.jar file and its related libraries in your project and create the correct folder layout for all those libraries to be included in your classpath. Maven relieves you of this burden; what you need to do is to specify the groupId (org.hibernate) and the artifactId (hibernate-core) and the last version available (3.3.1.GA). Those information can be found in either ibiblio.org or Hibernate tutorial book.
Thursday, April 29, 2010
Understanding Dependency - Starting HSQLDB server from Maven
Dependency is a mechanism for controlling modules in a project. Each dependency needs to be added under the dependencies element in pom.xml.
A dependeccy needs at least those elements: groupId, artifactId and version. To have mvn starting the HSQLDB server as specified in the tutorial, we need to add a dependency refering to an installed version of HSQLDB on the local drive. For that purpose, we need to know the groupId, the artifactId to be used. Using Google, ibiblio can help you know the correct groupId and artifactId to use for HSQLDB. In Google, search for "http://www.ibiblio.org/ maven2 hsqldb".
Open maven2-metadata.xml; this file contains the information about the groupId and artifactId for HSQLDB which are for both hsqldb. You also need to specify the scope element.
Maven Guide defines the scope of the dependency as a property that limits dependency transitivity. When you run Maven, it needs to discover the libraries needed for your application. Maven uses the dependency defined in pom.xml, but sometimes those dependencies require other dependencies that Maven will discover and include them automatically.
As specified earlier, the scope limits the transitivity of a dependency. There are 6 scopes that can be used, and the one to use when using a jar file from your local system (hsqldb is actually a jar file) is system.
The dependency element to add in your pom.xml is going to be:
<dependency>
<groupeId>hsqldb</groupId>
<artifactId>hsqldb</artifactId>
<version>2.0.0</version>
<scope>system</scope>
<systemPath>path/to/hsqldb.jar</systemPath>
</dependency>
You need to download hsqldb and add\lib to your system Path environment variable (user environment variable for Linux should work).
Then from the command line, type: mvn exec:java
-Dexec.mainClass="org.hsqldb.server.Server" -Dexec.args="-database.0 file:target/data/tutorial"
A dependeccy needs at least those elements: groupId, artifactId and version. To have mvn starting the HSQLDB server as specified in the tutorial, we need to add a dependency refering to an installed version of HSQLDB on the local drive. For that purpose, we need to know the groupId, the artifactId to be used. Using Google, ibiblio can help you know the correct groupId and artifactId to use for HSQLDB. In Google, search for "http://www.ibiblio.org/ maven2 hsqldb".
Open maven2-metadata.xml; this file contains the information about the groupId and artifactId for HSQLDB which are for both hsqldb. You also need to specify the scope element.
Maven Guide defines the scope of the dependency as a property that limits dependency transitivity. When you run Maven, it needs to discover the libraries needed for your application. Maven uses the dependency defined in pom.xml, but sometimes those dependencies require other dependencies that Maven will discover and include them automatically.
As specified earlier, the scope limits the transitivity of a dependency. There are 6 scopes that can be used, and the one to use when using a jar file from your local system (hsqldb is actually a jar file) is system.
The dependency element to add in your pom.xml is going to be:
<dependency>
<groupeId>hsqldb</groupId>
<artifactId>hsqldb</artifactId>
<version>2.0.0</version>
<scope>system</scope>
<systemPath>path/to/hsqldb.jar</systemPath>
</dependency>
You need to download hsqldb and add
Then from the command line, type: mvn exec:java
-Dexec.mainClass="org.hsqldb.server.Server" -Dexec.args="-database.0 file:target/data/tutorial"
Subscribe to:
Posts (Atom)